

Welcome to the wonderfully creative world of quilting! It can seem like there's a lot to learn, but every beautiful quilt you've ever admired comes together in three basic stages: making the top, putting the layers together, and finally, the quilting itself.
It’s a bit like learning to bake. First, you get the hang of measuring flour and mixing ingredients. Then you learn how to combine them into something truly special. Quilting is the same—you learn a few core skills, and before you know it, you’re turning stacks of fabric into treasured heirlooms.
This guide is your roadmap. We'll walk through each step, breaking down the jargon and showing you exactly how to bring your quilt ideas to life.
Your Journey Through the World of Quilting Techniques
Let’s dive into the process. We'll explore the essential techniques quilters use every day, from piecing intricate blocks to the final stitch that holds it all together. Think of it as building your own personal quilting toolbox.
The Three Core Stages of Quilting
Every single quilt, from a simple baby blanket to a king-sized masterpiece, follows the same fundamental path. Getting a handle on these three stages will give you a clear plan for any project you tackle.
-
Piecing the Quilt Top: This is where the magic starts. You'll cut your fabrics and sew them together to create the design you see on the front of the quilt. It's all about color, pattern, and precision.
-
Assembling the Quilt Sandwich: Once your top is done, you’ll layer it with batting (the fluffy stuff in the middle) and a fabric backing. Getting this "sandwich" smooth and secure is the key to a professional-looking finish.
-
Quilting and Finishing: This is the step that officially turns your fabric layers into a quilt! You'll stitch through the top, batting, and backing to hold them all together, adding texture and durability. The final touch is adding the binding around the edges.
The secret ingredient? Choosing the right materials from the start. The perfect batting, for instance, is what gives your quilt its signature feel—whether you want something lightweight and drapey or warm and cozy.
Understanding how these stages flow into one another is half the battle. If you're brand new to all this, our complete guide on how to quilt is a fantastic place to start. Here, we'll expand on those basics and dig deep into the specific methods you'll use at every step.
Mastering the Art of Piecing Your Quilt Top
This is where the magic really begins.## Mastering the Art of Piecing Your Quilt Top
This is where the magic really begins. Piecing the quilt top is the stage where your fabric choices and design ideas come together to create a personality. Think of yourself as both an architect and an artist—you're constructing a pattern while painting with cloth. It’s all about cutting fabric into specific shapes and sewing them together, piece by piece, until your beautiful quilt top emerges.
The different ways to piece a quilt are a lot like different artistic styles. Some are built on precision and structure, almost like an architectural blueprint. Others are more free-flowing and organic, like a watercolor painting. Let's dive into the foundational methods that quilters use to bring their visions to life.
This flowchart lays out the entire journey of a quilt, and it all starts with the piecing techniques we're about to explore.
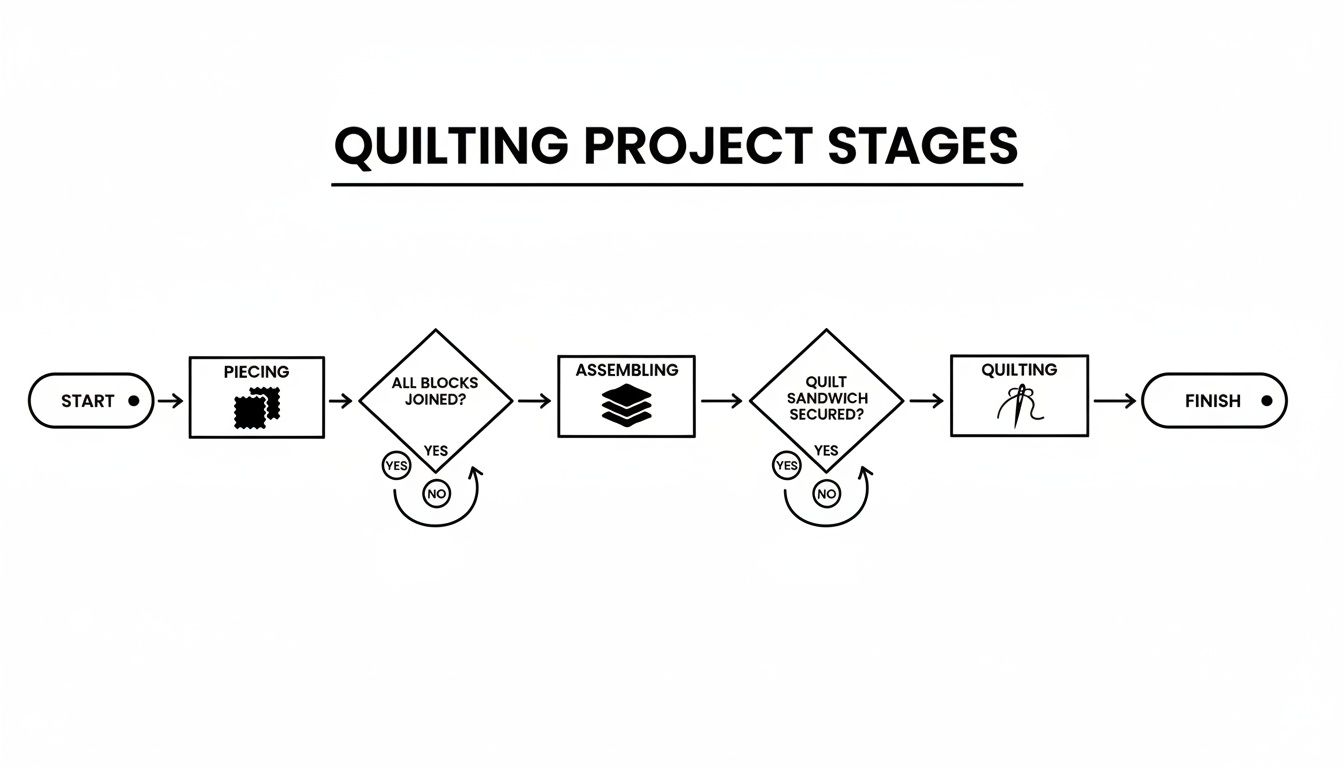
As you can see, every masterpiece starts with piecing. It’s the first critical step that sets the stage for everything that follows.
Traditional Piecing: The Workhorse Technique
When you picture quilting, you’re probably thinking of traditional piecing. It’s the most common method out there, built on sewing straight seams to join geometric shapes like squares, rectangles, and triangles. This is the bedrock of countless classic quilt patterns, from the humble Nine Patch to the beloved Log Cabin.
The single most important skill to nail here is a consistent ¼-inch seam allowance. It’s not an exaggeration to say it’s everything. Precision is what makes all your points meet perfectly and ensures your blocks come out the right size. For anyone just starting, this is the best place to begin. A simple pattern like our free Fence Rail quilt tutorial is a fantastic way to practice and build that muscle memory.
For quilts with lots of seams, you'll want a stable, low-loft batting—something like a quality cotton or an 80/20 cotton-poly blend. This kind of batting lays flat, won’t distort your hard work, and lets your pieced design be the star of the show.
Before we dive deeper, let's look at how the most common piecing methods stack up. This can help you figure out which approach is the right fit for your next project.
Choosing Your Piecing Technique
| Technique | Best For | Skill Level | Key Feature |
|---|---|---|---|
| Traditional Piecing | Geometric patterns, beginners, fast assembly | Beginner | Relies on an accurate ¼-inch seam |
| English Paper Piecing | Intricate shapes (hexagons!), hand-sewing, travel | Beginner+ | Extremely precise results from paper templates |
| Foundation Paper Piecing | Complex angles, sharp points, pictorial blocks | Intermediate | Sew-by-numbers approach for guaranteed accuracy |
| Appliqué | Curves, illustrative designs, adding layers | Varies | Sewing shapes onto a background, not edge-to-edge |
Each of these techniques opens up a different world of creative possibilities. Your choice will shape not only the look of your quilt but also the experience of making it.
English Paper Piecing: The Meditative Hand-Sewing Method
If you love the quiet rhythm of a needle and thread, English Paper Piecing (EPP) is pure joy. With EPP, you wrap fabric around paper templates—often hexagons—and then whipstitch the folded edges of the pieces together. The paper acts as a perfect guide, giving you incredibly precise shapes and sharp points that can be tough to get on a machine.
One of the best things about EPP is its portability. You can pack a small kit and take your project literally anywhere. It’s a slow, relaxing process that’s all about accuracy. This method actually dates back to 17th-century Britain and is as popular as ever. In fact, a recent survey found that 18% of new quilters are specifically drawn to hand techniques like EPP because they’re so calming and accessible.
Because EPP creates such a flat, defined quilt top, a low-loft 100% cotton batting is a beautiful choice. It preserves the crispness of all that handwork without adding extra bulk.
Foundation Paper Piecing: For Perfect Points
When a pattern calls for razor-sharp points and angles that seem impossible, Foundation Paper Piecing (FPP) is your secret weapon. With FPP, you sew your fabric directly onto a printed paper pattern, following a numerical sequence. The paper works as both a stabilizer and a foolproof stitch-and-flip guide, practically guaranteeing perfect results.
Think of FPP as painting by numbers, but with fabric. It can feel a bit backward at first, but once you get the hang of it, you'll see why it’s the go-to technique for stunningly intricate blocks, like a Mariner’s Compass or detailed picture quilts.
Here's a quick look at the process:
- Prepare Your Pattern: Cut out the paper foundation piece.
- Position Fabric: Place your first piece of fabric on the unprinted side of the paper, making sure it covers section 1 completely.
- Stitch and Flip: Lay your second fabric piece on top of the first, right sides together. Sew along the line between sections 1 and 2, then flip the second piece open and give it a good press.
- Repeat: Keep going with this stitch-and-flip motion, following the numbers in order.
- Trim and Join: Once the block is done, trim it along the final seam allowance line. After you've joined all your blocks, you get the satisfaction of tearing away all the paper.
Appliqué: Adding Artful Layers
So far, we’ve been talking about joining fabrics edge-to-edge. Appliqué is different. It’s the art of sewing smaller fabric shapes onto a larger background fabric. This technique is how you create beautiful curved and illustrative designs that would be impossible with standard piecing. It’s like making a collage, but with fabric and thread.
There are a few ways to approach it:
- Machine Appliqué: This is often the fastest method. You secure your shapes to the background with a fusible web and then stitch around the edges, usually with a decorative satin stitch.
- Hand Appliqué: The classic approach. Here, you turn the raw edges of the shape under and secure them with tiny, almost invisible stitches for a gorgeous, seamless look.
- Raw-Edge Appliqué: A more modern take where you stitch the shapes down without turning the edges under. This creates a slightly rustic finish that will fray just a little over time, adding great texture.
Appliquéd quilts often look their best with a batting that gives them a little support and definition. A cotton/poly blend or even a lightweight wool batting can help the appliquéd shapes pop, adding a lovely, subtle dimension to your final design.
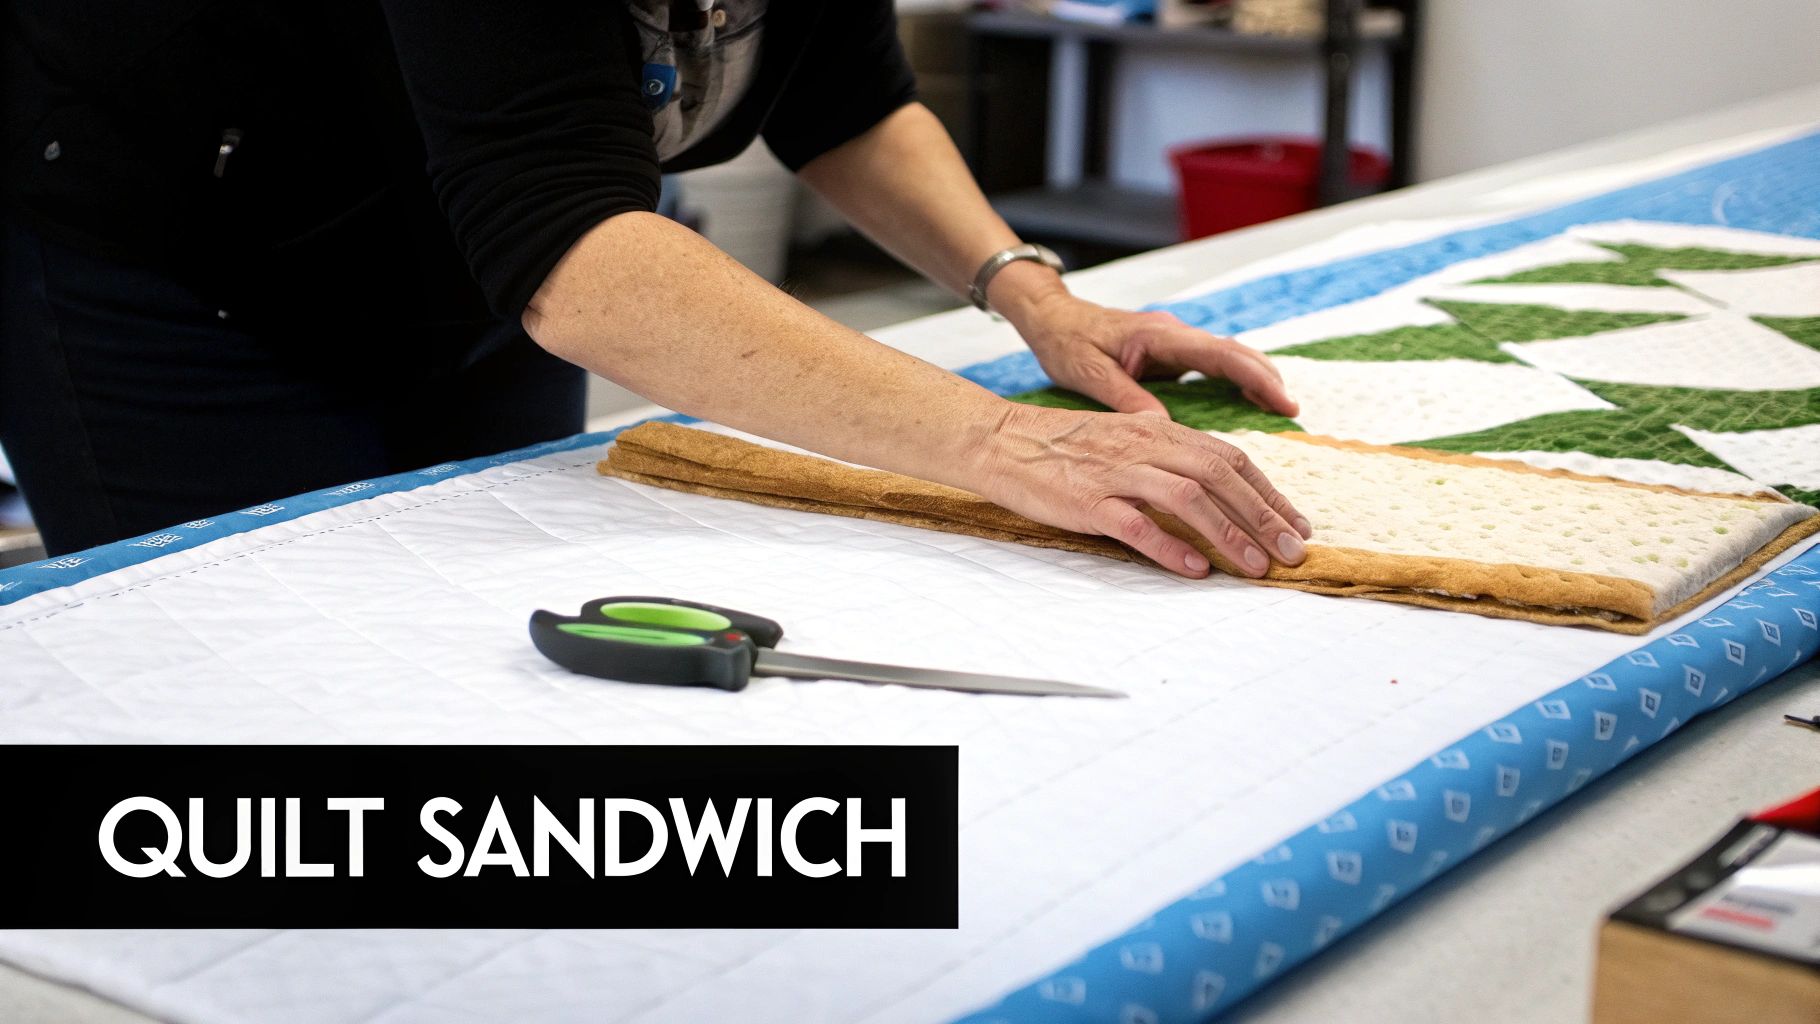
So, you've poured your heart and soul into piecing that beautiful quilt top. What's next? The moment of truth: building the quilt sandwich.
This is one of those make-or-break techniques of quilting. Get it right, and the rest is smooth sailing. But a poorly made sandwich can cause puckers, folds, and a whole lot of frustration. I always think of it like laying the foundation for a house—if it isn’t perfectly stable and smooth, you'll see every little flaw in the finished product.
A quilt sandwich is just what it sounds like: three layers. You have your quilt top, the batting in the middle, and your fabric backing. The whole point is to temporarily lock these layers together so they don’t dare shift an inch while you’re quilting. We call this crucial step basting, and it’s the secret to getting that polished, professional look we all crave.
Choosing Your Basting Method
Every quilter has their favorite way to baste, and honestly, there's no single "right" way. The best method for you really depends on your personal preference, the size of your quilt, and how much floor (or table) space you have to work with.
Let’s talk through the three most common approaches.
- Pin Basting: This is the old-school, tried-and-true method. Using special curved safety pins, you secure the layers together. The key is to place a pin every 4-6 inches, starting from the very center and smoothing your way out to the edges. Think of it like creating a secure grid.
- Spray Basting: Need to get it done fast? Spray basting might be your new best friend. You use a temporary spray adhesive to gently tack the layers together. It's fantastic because there are no pins to get in the way of your quilting, but you absolutely need a well-ventilated space to do it.
- Hand Basting: For those who love the process and want total control, there's hand basting. With a needle and thread, you make long, running stitches to hold everything in place. It's the most time-consuming of the bunch, but it’s arguably the most secure.
No matter which path you choose, the goal is always the same: create a smooth, taut sandwich that won't shift. A well-basted quilt is an absolute dream to quilt. A loose or wrinkled one will fight you every single step of the way. Trust me, the time you spend here pays off big time.
If you want to dive deeper into each of these methods with step-by-step instructions, our full guide on how to baste a quilt is the perfect place to start.
The Heart of the Quilt: Batting
The batting is the soul of your quilt sandwich. It’s what gives your quilt its final weight, warmth, drape, and texture. Don’t just grab any old batting; matching it to your project is what separates a good quilt from a great one.
Here’s a quick rundown of the most popular options:
- Cotton Batting: This is a classic for a reason. 100% cotton batting gives you that traditional, heirloom feel and a lovely drape. It’s breathable and has a low-loft, meaning it lies flat, which really makes your piecing and quilting stitches the star of the show.
- Wool Batting: Looking for warmth without the bulk? Wool is your answer. It's incredibly lightweight, lofty, and resilient, so it bounces back beautifully and resists creases. That natural puffiness it provides makes quilting stitches pop.
- Blends (like 80/20 Cotton/Poly): I call this the workhorse of the batting world. An 80/20 blend truly offers the best of both worlds—you get the softness and breathability of cotton, plus the durability and slightly higher loft of polyester. It’s a wonderfully versatile choice for just about anything.
Choosing the right batting is more than just a technical step; it’s a creative decision. Think about how the quilt will be used and the final feel you're going for. The right choice will elevate your project from just a blanket to a true piece of art.
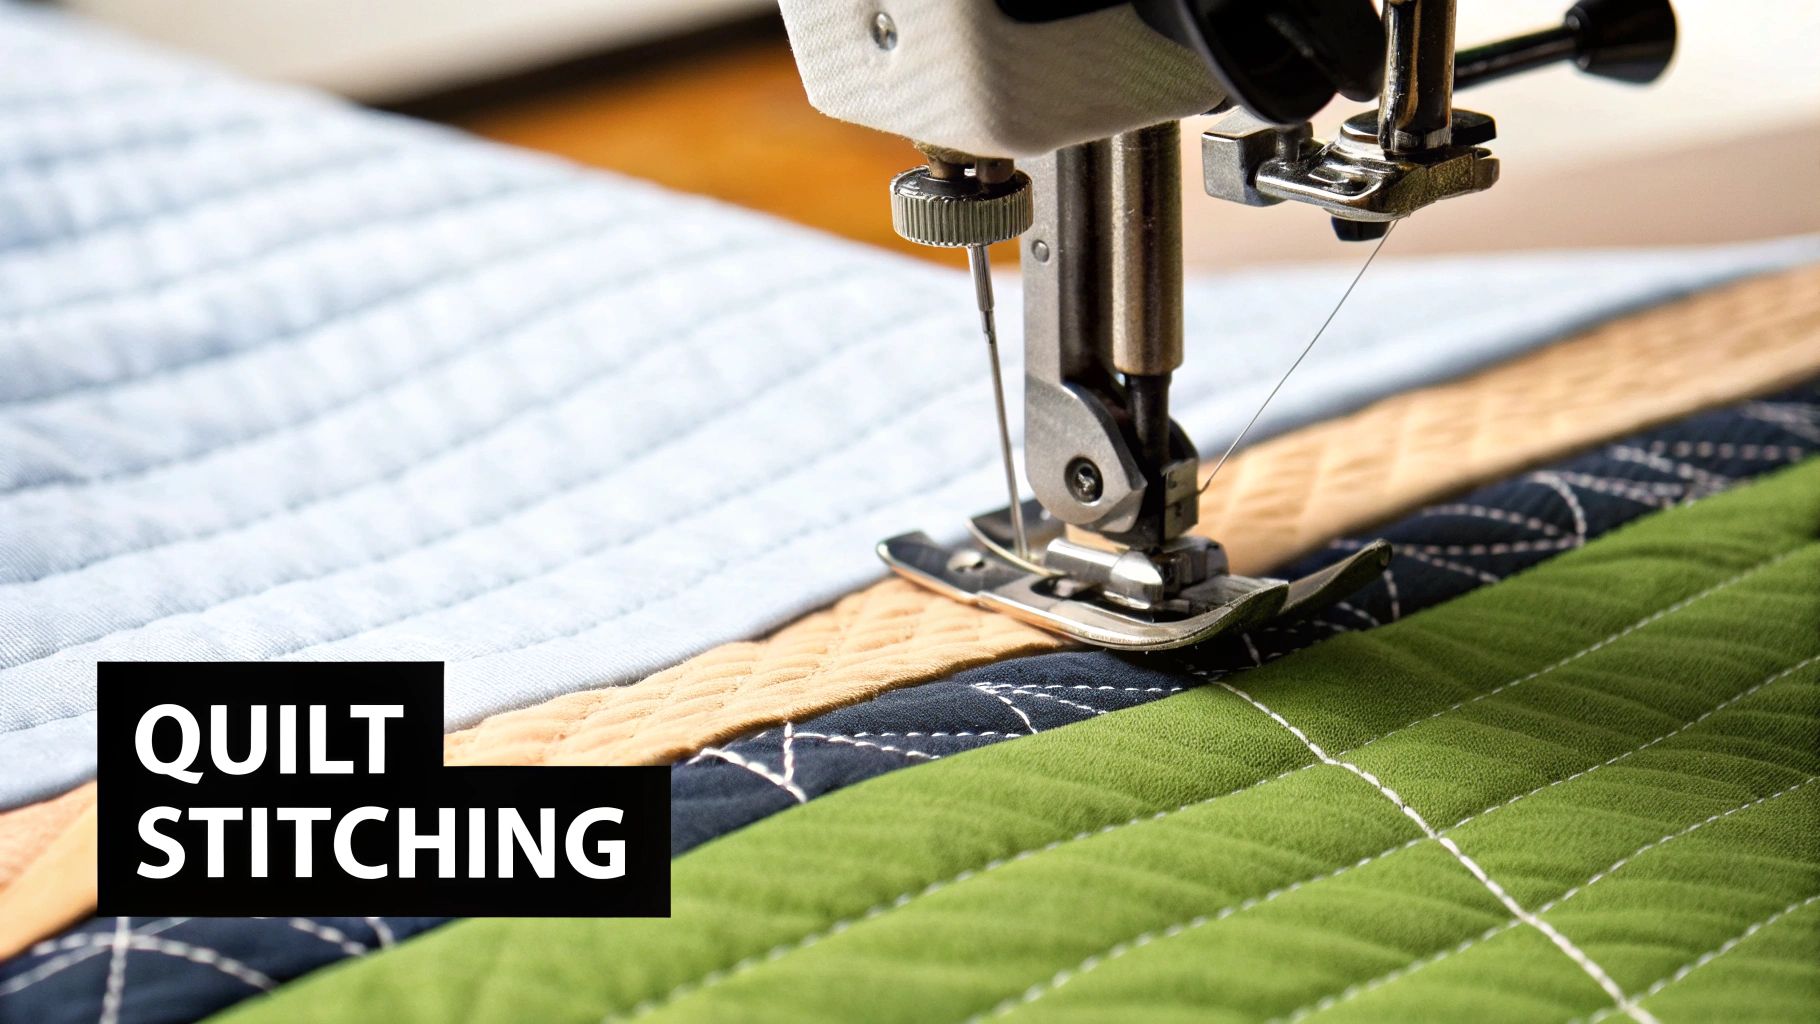
Bringing Your Quilt to Life With Stitching
You’ve basted your quilt sandwich, and now the real magic happens. This is the moment where three distinct layers—the top, the batting, and the backing—finally become a single, unified quilt. The stitches you add are more than just functional; they're the final artistic touch that infuses texture, dimension, and your unique personality into the piece.
Think of the quilting as the final brushstrokes on a canvas. Your stitches can echo the shapes you've pieced, create a bold geometric contrast, or add soft, flowing curves across the surface. Every decision from here on out defines the final look and feel of your work.
There are a few creative paths you can take, from the quiet rhythm of hand quilting to the speed and power of a machine. Let's walk through the most common techniques to figure out which one is the perfect fit for your project.
Hand Quilting: The Classic Touch
Hand quilting is where it all began. It's a slow, meditative process that creates a deep connection between you and your work. With just a needle and thread, you create small, running stitches that pierce all three layers. The result is a quilt with a softness and gentle texture that a machine just can't duplicate, giving it that timeless, heirloom quality.
The beauty of hand quilting is in its simplicity. You can do it almost anywhere. The process boils down to a few key steps:
- Knot Your Thread: Start with a small, tight quilter’s knot.
- Pop the Knot: From the top, poke your needle into the quilt top about an inch away from where you want to start stitching. Gently pull the thread so the knot "pops" through the fabric and hides itself inside the batting.
- Rock the Needle: Using a thimble is a must! You'll rock the needle up and down through the layers, loading several even stitches onto it before pulling the thread all the way through.
To make your stitches a feature, a slightly heavier thread like a Perle Cotton 8wt is a great choice. When it comes to batting, 100% cotton is a dream for hand quilting. Your needle will glide through it, and it gives the finished quilt that classic, flat look that really lets your stitch work shine.
Machine Quilting: Speed and Precision
For most modern quilters, machine quilting is the go-to. It's fast, incredibly precise, and opens up a whole universe of design possibilities. On a standard home sewing machine, you’ll typically tackle this in one of two ways: straight-line quilting or free-motion quilting.
Before you start, do yourself a favor: clean your machine and put in a fresh needle. It's a tiny step that prevents so much frustration from skipped stitches. It also helps to lengthen your stitch to around 3.0-4.0 mm; this not only looks more professional but also helps the quilt drape better.
A walking foot is the single most important tool for machine quilting. It has its own set of feed dogs that work in tandem with your machine's, grabbing the top and bottom layers of your quilt and feeding them through evenly. This is your secret weapon against puckers and shifting.
Seriously, this simple attachment is an absolute game-changer for getting crisp, professional results.
Straight-Line Quilting With a Walking Foot
This is by far the most beginner-friendly machine quilting technique. With your walking foot engaged, you'll stitch straight or gently curving lines across your quilt. But don't mistake simple for boring! This method is perfect for creating sophisticated, modern designs.
Some popular straight-line patterns include:
- Stitching in the Ditch: This means quilting directly in the "ditch" created by your seam lines. From the front, the stitches nearly disappear.
- Grid or Crosshatch: A timeless pattern of intersecting lines that adds beautiful structure and texture.
- Echo Quilting: Stitching lines that echo the shapes of your pieced blocks, usually about a ¼-inch away.
For straight-line quilting, an 80/20 cotton/poly blend batting is a fantastic all-rounder. It gives you just enough stability and a little bit of loft to make those quilted lines pop, and it drapes beautifully.
Free-Motion Quilting: Drawing With Thread
Ready to really let your creativity fly? Welcome to Free-Motion Quilting (FMQ). To get started, you'll lower your machine’s feed dogs and attach a special darning or "free-motion" foot. This lets you move the quilt in any direction—up, down, sideways, you name it—letting you literally draw on your quilt with thread.
FMQ definitely has a learning curve, but once you get the hang of it, the possibilities are endless. You can stitch meandering stipples, elegant feathers, complex swirls, or even sign your name. A good pair of quilting gloves with grippy fingers makes a world of difference in controlling the quilt's movement. Your thread choice is also critical here; for a deeper dive, you can explore our guide to machine quilting threads.
Longarm Quilting: The Professional Finish
For those really big quilts, or for quilters who'd rather just focus on piecing, longarm quilting is an amazing option. A longarm is a massive, specialized sewing machine mounted on a large frame. The quilt is stretched taut on the frame, and the machine head moves over it.
This setup completely eliminates the struggle of stuffing a bulky quilt through the tiny throat space of a home machine. Longarmers can execute incredibly intricate designs with breathtaking speed and precision, often using computer-guided systems for flawless patterns. If you don't own one, you can hire a professional longarm service to finish your quilt top for you. They often favor wool batting because its incredible loft and resilience really showcase those elaborate, gorgeous quilting designs.
Exploring Advanced and Specialty Quilting Techniques
Once you’ve mastered the basics of piecing and quilting, you start to get an itch. You’re ready to move beyond the familiar and explore techniques that can truly make your work sing. This is where the real fun begins.
Think of these advanced methods as new colors on your palette. They’re what let you add incredible texture, tell a deeper story, and push your creativity into new territory. Let's dive into a few techniques that can elevate your quilts from beautiful to absolutely unforgettable.
Trapunto: The Art of Sculptural Quilting
Have you ever seen a quilt where a flower or a feather seems to leap off the fabric? That’s the magic of trapunto. This elegant technique gives your work a stunning, high-relief effect that feels almost three-dimensional. It’s all about making specific parts of your design puff up from the surface.
So, how does it work? You stitch the outline of your chosen motif through the quilt top and a temporary backing. Then, you carefully make a tiny slit in that backing and stuff the area with extra batting. The result is a raised, embossed look that plays beautifully with light and shadow, adding a touch of drama you just can’t get any other way.
Dating back to 14th-century Italy, trapunto has long been a mark of high-end quilting. It’s no wonder that the global quilt market, which thrives on these premium techniques, hit a value of USD 695.84 million in 2024 and is expected to soar to USD 1.15 billion by 2030. Want to try it yourself? Wool batting is your best friend for trapunto. Its natural resilience and high loft make those motifs pop perfectly. For more on this trend, check out these insights on the growth of the quilt market.
Sashiko: A Meditative Stitching Tradition
Sashiko is a traditional Japanese stitching art that is as much about mindfulness as it is about thread. It began as a practical way to mend and reinforce clothing, but it has since blossomed into a celebrated art form. Its beauty lies in its simplicity: bold, geometric patterns created with a simple running stitch, usually in white thread on a classic indigo background.
Unlike the quilting stitches that hold your layers together, Sashiko is more like embroidery. You create these striking graphic designs on a single piece of fabric, which can then become a feature panel in a larger quilt. The process itself is rhythmic and calming, a true meditation in thread.
The key to stunning Sashiko is consistency. Every stitch should be uniform in length, and the spaces between them should be just as consistent. The focus is on creating a seamless, flowing pattern that is both visually powerful and deeply calming to create.
When you incorporate Sashiko panels into a quilt, you need a batting that will honor that intricate work. A dense, stable 100% cotton batting with scrim is the perfect choice. It provides a firm foundation that prevents any distortion, ensuring every one of your carefully placed stitches remains crisp and clear.
Improv Piecing: Finding Freedom in Spontaneity
If you’re the kind of quilter who finds patterns a bit too restrictive, you’re going to love improv piecing. This is your permission to play, to let go of the rules and create straight from the heart. Forget the pattern; just grab your fabric and go. You might start with a simple shape and just build from there, trimming, adding, and rearranging as inspiration strikes.
Improv quilting is all about embracing the happy accidents—the wonky seams, the unexpected color pairings, and the beautifully organic shapes that emerge. It’s also a fantastic way to finally use up that growing scrap pile and find your own unique design voice.
The flow is wonderfully intuitive:
- Start Small: Sew a few random scraps together to create a little "starter" block.
- Build Out: Keep adding strips or shapes, trimming and squaring up whenever it feels right.
- Join Sections: Once you have several of these improv-pieced sections, start arranging and joining them to build your final composition.
Because improv quilts are so free-flowing, an 80/20 cotton/poly blend batting is an ideal partner. It gives you the perfect balance of soft drape and gentle stability, complementing the organic nature of the piecing without making it too stiff. This is quilting that’s less about perfection and all about pure expression.
Common Questions About Quilting Techniques
Stepping into the world of quilting is exciting, but it definitely sparks a lot of questions. Whether you're standing in a fabric store totally overwhelmed by choices or trying to fix a project that's gone a bit sideways, you're in good company. This is the spot where we tackle some of the most common hurdles quilters face, with practical advice to get you creating with confidence.
Think of this as your go-to quilting help desk. We'll demystify the tricky bits so you can spend less time second-guessing and more time at your sewing machine.
What Is the Best Quilting Technique for a Beginner?
If you're starting out with a sewing machine, the absolute best place to begin is with traditional piecing using pre-cut fabrics. Grabbing a charm pack or a layer cake takes the stress out of cutting and lets you focus on the single most important skill you'll ever learn: sewing a consistent ¼-inch seam allowance. Everything else you do in quilting builds on that foundation.
But what if you prefer the quiet, meditative process of hand sewing? In that case, English Paper Piecing (EPP) is a fantastic, wonderfully forgiving choice. It's also incredibly portable. Starting with a simple shape like hexagons will teach you the whipstitch and help you get those perfect, sharp points without the pressure of a machine.
No matter which path you choose, start small. A pillow cover or a table runner gives you the full quilting experience—piecing, basting, quilting, and binding—without the daunting scale of a king-sized quilt.
How Do I Choose the Right Batting for My Project?
This is a big one. Choosing the right batting is what truly shapes the final look, feel, and purpose of your quilt. The decision really comes down to what you want your quilt to do and how you want your stitching to look.
Here’s a quick guide to pairing your project with the perfect batting:
- For a Flat, Traditional Look: If you want your beautiful piecing or delicate hand quilting stitches to take center stage, you can't go wrong with a low-loft 100% cotton batting. It creates that classic, antique drape and makes every stitch pop.
- For a Cozy Bed Quilt: An 80/20 cotton/poly blend is a workhorse for a reason. You get the soft, breathable feel of cotton plus a little extra durability and loft from the polyester. It makes a quilt that’s warm, cuddly, and built to last.
- For Maximum Warmth and Loft: When you need serious warmth without the weight, wool batting is your best friend. It’s naturally springy and lofty, which also makes it the perfect choice for techniques like trapunto, where you want your designs to have a beautiful, sculptural quality.
Think of batting as the supporting actor in your quilting story. A great choice doesn’t steal the show; it makes the star—your piecing and stitching—look even better. It’s the secret ingredient that pulls everything together.
Can I Mix Different Quilting Techniques in One Project?
Absolutely! In fact, this is where quilting gets really fun. Combining different techniques is one of the best ways to find your own creative voice and make something that is truly yours. It’s a chance to show off your skills and turn a simple quilt into a piece of art.
For instance, you could piece a simple background of squares and then use hand-appliqué to add a stunning floral motif right in the center. Or, imagine a panel of intricate EPP hexagons framed by a larger, machine-pieced quilt top. Mixing things up adds texture and a visual depth that you just can't get with one method alone.
The trick is to plan ahead. Just think about how different fabric weights and seam types will play together before you start sewing. A little forethought is all it takes to make a mixed-technique quilt that’s a beautiful showcase of your talent.
What Is the Difference Between Free-Motion and Straight-Line Quilting?
The difference really boils down to control versus freedom.
Straight-line quilting is all about structure. You use a walking foot on your machine, which is designed to grip all three layers of your quilt sandwich and move them through evenly. This gives you beautiful, crisp parallel lines, grids, or geometric patterns. It’s a go-to for modern and minimalist designs.
Free-Motion Quilting (FMQ), on the other hand, is pure creative expression. You drop the feed dogs on your machine and attach a darning foot, which frees you up to move the quilt in any direction you want. You're basically drawing with your needle. FMQ is how you get those gorgeous meandering stipples, feathers, and custom motifs, but it definitely takes some practice to get your rhythm and stitch length just right.
At Quilt Batting, we know that the right foundation changes everything. Whether you need a low-loft cotton for your very first pieced quilt or a resilient wool for an ambitious trapunto project, we have the perfect roll of batting to bring your vision to life. Explore our collection of premium Hobbs and Pellon batting and find the ideal match for your next masterpiece.